Just replace Rennes by another site which has nodes with several interfaces (see [https://api.grid5000.fr/sid/ui/quick-start.html the API page]).
Just replace Rennes by another site which has nodes with several interfaces (see [https://api.grid5000.fr/sid/ui/quick-start.html the API page] to find such a site).
This page is actively maintained by the Grid'5000 team. If you encounter problems, please report them (see the Support page). Additionally, as it is a wiki page, you are free to make minor corrections yourself if needed. If you would like to suggest a more fundamental change, please contact the Grid'5000 team.
The goal of this tutorial is to present a example of usage of Grid'5000, which benefits from the capability of reconfiguration of the network topology of the platform, using KaVLAN.
KaVLAN is a tool of Grid'5000, which allows a user to manage VLANs in the platform. Behind the scene, KaVLAN actually changes the configuration of the network switchs, to set the VLAN membership (VLAN ID) for the ports which are cabled to the network interfaces of one or more nodes. That mechanism can provide a layer 2 network isolation for experiments.
Three kinds of KaVLAN VLANs are available on Grid'5000. You can find more information in the KaVLAN page. In this tutorial, we will only use global and local VLANs (but no routed VLAN).
Before going further with the practical setup proposed in this page, it is strongly advised to read the KaVLAN page.
Topology setup
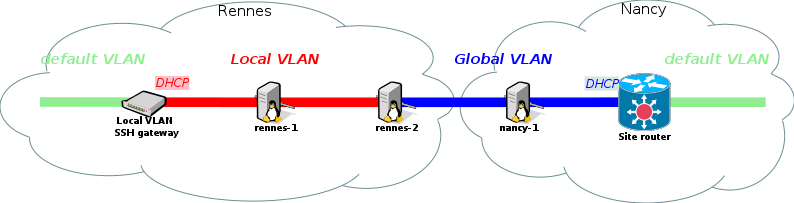
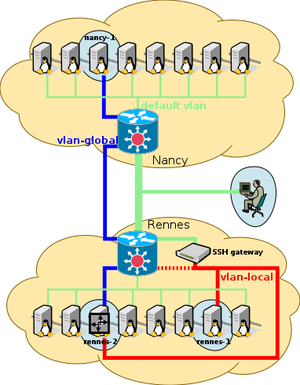
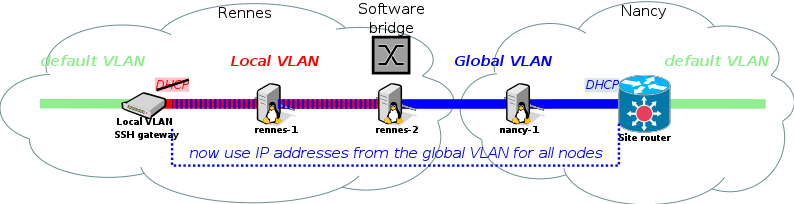
In this first part of the tutorial, we setup a topology, as presented in the following picture.
Reservations of the resources
First of all we will create jobs to reserve:
2 nodes providing at least 2 network interfaces each, on one site
1 local VLAN on the same site
1 global VLAN
1 node on another site
In the text below, we use the sites of Rennes and Nancy (but other sites could be used, see below):
Rennes for the 2 nodes with several network interfaces, and the local VLAN.
Nancy for the other node
(we'll discuss later about the global VLAN).
Consequently, practically speaking, you are advised to open 2 terminal windows (2 separate shells) for the tutorial, one for Rennes and one for Nancy.
In Rennes (Rennes terminal)
In Rennes, we have to reserve 1 local VLAN, and 2 nodes for instance of the paravance cluster, because that cluster is composed of nodes with 2 network interfaces (in order to find other Grid'5000 clusters providing such a characteristic, you can go to this API page).
We also try to reserve the global VLAN in Rennes as well.
Note
Please mind the fact that a global VLAN spreads all over Grid'5000, so we only need to reserve it on one site.
Since we have to work on 2 different sites, we will use OAR advance reservations in order to have 2 jobs that start and end at the same dates. Let's define STARTDATE as the start date (e.g. "2016-01-21 14:00:00", don't worry if it is in the past for a few minutes), and WALLTIME as the duration of the job (e.g. the duration for the tutorial).
Once logged to Rennes' frontend in our first terminal, we execute:
To use KaVLAN, a job of type deploy (kadeploy) is mandatory
Unfortunately, that command may fail (return KO):
either because there are no more paravance nodes available for the time of the tutorial, or no more local VLAN: that should not be too likely to happen
or because the global VLAN of Rennes is already taken: that is very likely to happen during a common tutorial session with many students !
In either case, one will have to try to use another site than Rennes, or try again later.
If you face issue #1
Just replace Rennes by another site which has nodes with several interfaces (see the API page to find such a site).
If you face issue #2
Only reserve 1 local VLAN, and 2 nodes of the paravance cluster, but keep the global VLAN reservation for the other site (to simplify the writing of this tutorial, we assume that the global VLAN of Nancy is available, but any other site with a free global VLAN could do).
So, if the previous command fails because Rennes' global VLAN is not available, only execute:
If we succeed to reserve the global VLAN in Rennes, we just need to reserve a single node in Nancy. In our second terminal, we log to Nancy's frontend, and execute:
Again, a successful oarsub command should have returned a JOBID (which of course may certainly not be the same as the one of the job in Rennes).
If the oarsub fails (reservation is said "KO"), that means that you probably should try to use yet another site than Nancy, where the global VLAN would be available.
To keep it simple, let's call our node in Nancy nancy-1 (e.g. nancy-1 = graphite-3).
You can now look at which VLANs you get, as above.
rennes:frontend:
kavlan -V -j JOBID
Deployment of our operating system for the experiment
In Rennes (Rennes terminal)
Back on the Rennes termnal, we now enter our job in order to benefit from OAR environment variable $OAR_NODEFILE.
rennes:frontend:
oarsub -C JOBID
(JOBID is the one of the job of Rennes of course)
Then we launch the deployement of the Debian Jessie minimal environment to the nodes:
rennes:frontend:
kadeploy3 -e jessie-x64-min -k -f $OAR_NODEFILE
Note
We choose to not use the --vlan VLAN-ID option of kadeploy3 here, because we want to tweak VLANs ourselves.
In order to be capable of doing ssh from one node to the other, we push our SSH private key to the nodes.
rennes:frontend:
for node in $(uniq $OAR_NODEFILE); do scp ~/.ssh/id_dsa $node:.ssh/; done
Note
When access to a node is broken due to a error in a network setup for instance, the Kaconsole tool becomes very handy: it allows to connect to the serial console of a node, quite the same way you would connect to a virtual console of a GNU/Linux workstation (CTRL+ALT+F1), to for instance fix the network configuration.
frontend:
kaconsole3 -m rennes-1
Credentials for login on the console with our deployed environment is "root":"grid5000".
In Nancy (Nancy terminal)
We run from Nancy's frontend the same commands as in Rennes, but use the JOBID of Nancy of course.
Installation of useful extra packages for networking
In this tutorial we are going to need some extra packages which are not installed in jessie-min environment, such as tcpdump. Since we are going to modify the network configurations making the Internet unreachable from the nodes, we must install them beforehand.
Besides, you may wish to play with (or debug) your network configuration with other tools like ethtool, dig, or traceroute as well. If you want to use them later you need to install them now too.
Thanks to KaVLAN, we will have a layer 2 network isolation for our nodes. That means that whatever IP configuration we set in our VLAN, there will be no risk to break the network configuration in the default VLAN or to disturb other users (for instance by misusing reserved IP addresses). We can even setup network services or protocols based on IP broadcast for instance (e.g. DHCP) with no risk of polluting the default VLAN (or conflicting with the platform's defaut VLAN DHCP service).
However, we must keep in mind that:
We must be very careful to what VLAN the node is in at any time. Indeed, a mistake could quickly lead to some changes to the nodes network configuration while the node is actually still in the default VLAN, which could impact other users/experiments.
While it can be interesting to manage by ourselves the IP addressing of the nodes in our VLAN, Grid'5000 provides predefined IP addresses for within any VLAN, which can be very handy (see the KaVLAN page), especially because they are served by a DHCP service within each VLAN. So both options are possible, and one has to weigh the pros and the cons, depending on the actual need.
Setting up our own IP addressing mechanism can actually be seen as an "expert mode", which the kavlan command provides some support to as well, allowing to disable the DHCP service in a VLANs is required. Please really mind what you do when in that export mode.
If not using the IP addressed which are provided by Grid'5000, routing to Global VLANs and Routed VLANs will not work, and neither will do SSH gateways to local VLANs. However, if all or some of those feature as not useful for your experiment, it is not harmful.
That said, for this tutorial and up until the openvswitch section, we will use the predefined IP addresses provided by Grid'5000. This will be very handy thanks to the DHCP services which are provided in the VLANs.
Furthermore, for the ease of reading of this document, let's have:
G_ID = the ID of the global VLAN we reserved
L_ID = the ID of the local VLAN we reserved
In Nancy (Nancy terminal)
The nancy-1 node is in the global VLAN. Thus, it will get in there the IP address which correspond to nancy-1-kavlan-G_ID. See the table in the KaVLAN page to find out the correponding IP address, or run:
nancy:frontend:
hostnancy-1-kavlan-G_ID
Since the IP configuration of the network Interface uses DHCP in the environnement we deployed, the mechanism we have to trigger is the following:
Change the VLAN of the node
Restart the network service
Since out node won't be reachable with is old IP address (the one for the default VLAN) once put in the global VLAN, we have to create before action #1, a trigger for running action #2 asynchronously. That can be done using the at for instance. Let's do that in one command line:
nancy:frontend:

ssh root@nancy-1 "echo 'service networking restart' | at now + 1 minute" && kavlan -s -i G_ID -m nancy-1.nancy.grid5000.fr --verbose
Another option would be to use Kaconsole, to access the node via its serial console to run action #2, but that is definitely not scalable to many nodes, so it is to be kept as a last resort option.
Note
Feel free to make different tests, with at or with Kaconsole. To start over, you can put the node back in the default VLAN with the following command:
to put rennes-1 and rennes-2 default network interfaces (eth0) in the local VLAN, and have their IP addresses changed accordingly.
to put rennes-2 secondary network interface (eth1) in the global VLAN and have the IP address changed accordingly.
That way, rennes-2 will be in-between the local and the global VLANs, which is the heart of our setup.
For the first action, we do the same as for Nancy's node, but with the local VLAN instead of the global VLAN, and using taktuk to benefit from a parallel execution on the 2 nodes:
unlike kadeploy, kavlan required full hostname for the -m parameter.
We now have to put rennes-2 secondary network interface in the global VLANs. That secondary interface can be referenced with the following hostname: rennes-2-eth1-code class="replace">G_ID.
Since the node is not reachable anymore from the default VLAN, we will use Kaconsole to restart the network service in that case, after having run the kavlan command:
The following table summarizes the hostnames and access to the machine, depending on the VLAN:
nancy-1
rennes-2
rennes-1
access from default VLAN
default VLAN
nancy-1
rennes-2
rennes-1
local VLAN
rennes-2-kavlan-L_ID
rennes-1-kavlan-L_ID
via SSH gateway:kavlan-L_IDin the local site
global VLAN
nancy-1-kavlan-G_ID
rennes-2-eth1-kavlan-G_ID
routed from any site
First tests of the topology
We can now run some some basic tests:
Try to ssh to nancy-1 in the global VLAN from the frontend of any Grid'5000 site, then to rennes-2 and finally to rennes-1
Try to ssh to the SSH gateway of the local VLAN, then to rennes-1, then to rennes-2 and finally to nancy-1
Try to ping rennes-2 IP in its local VLAN, then in the global VLAN from nancy-1
Try to ping rennes-1 IP in the local VLAN from nancy-1
Try to ping nancy-1 IP in the global VLAN from rennes-1
For that purpose, you will have to find out the hostnames and IP addresses of the machines in the VLANs ! See KaVLAN.
Only the last pings between nancy-1 and rennes-2 (either way) should fail.
Setup of the IP routing between the 2 VLANs
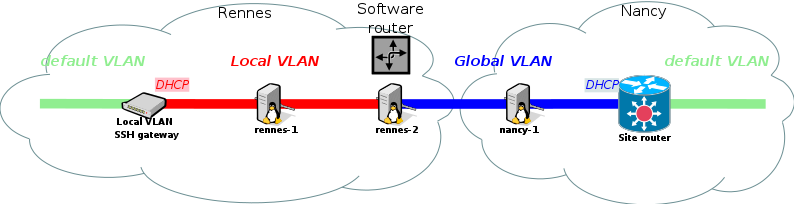
Topology with a software router
rennes-1 and nancy-1 are in separate VLANs. While rennes-2 which is on both VLANs can act as a SSH gateway, not IP networking is possible directly from rennes-1 to nancy-1 (or the way around).
To enable that, we will activate the IP routing feature of Linux on rennes-2. This in fact only consist in activating a sysctl, as follows:
rennes:node2:

sysctl -w net.ipv4.ip_forward=1
But we also need to set are new entry in the routing table of both rennes-1 and nancy-1.
To find out the IP network of the local VLAN and of the global VLAN, we can either look at the tables in the KaVLAN page, or examine the IP configuration of the interfaces of rennes-1, with ifconfig or ip addr.
Let's have:
the network for the global VLAN written G_NETWORK/G_NETMASK
the network for the local VLAN written L_NETWORK/L_NETMASK
the IP address of rennes-2 on the global VLAN written G_IP_rennes-2
the IP address of rennes-2 on the local VLAN written L_IP_rennes-2
We can add on rennes-1 a route to the global VLAN as follows:
rennes-1:

ip route add G_NETWORK/G_NETMASK via G_IP_rennes-2
And on nancy-1 a route to the local VLAN as follows:
rennes-1:

ip route add L_NETWORK/L_NETMASK via L_IP_rennes-2
Routing should now be operational!
New tests with IP routing enabled
We first check if packets are able to find their way via our router.
We run on node1 and node2 (in Rennes) the following commands:
rennes:node2:

tcpdump -i eth0 icmp
(tcpdump is a network traffic sniffer, here filtering ICMP traffic on eth0)
rennes:node1:

ping 192.168.1.1
On the first terminal you should see that the ICMP packets are forwarded on node2 :
IP 192.168.200.7 > 192.168.1.1: ICMP echo request, id 4270, seq 1, length 64
IP 192.168.1.1 > 192.168.200.7: ICMP echo reply, id 4270, seq 1, length 64
IP 192.168.200.7 > 192.168.1.1: ICMP echo request, id 4270, seq 2, length 64
IP 192.168.1.1 > 192.168.200.7: ICMP echo reply, id 4270, seq 2, length 64
IP 192.168.200.7 > 192.168.1.1: ICMP echo request, id 4270, seq 3, length 64
IP 192.168.1.1 > 192.168.200.7: ICMP echo reply, id 4270, seq 3, length 64
If ip forwarding was disabled on node2 (see above the sysctl command to disable it), nothing will happen in tcpdump and ping should report errors.
We also check the packet route with traceroute from node1:
rennes:node1:

traceroute 192.168.1.1
We should see two hops: the intermediary router and the target:
traceroute to 192.168.1.1 (192.168.1.1), 30 hops max, 60 byte packets
 1  192.168.200.8 (192.168.200.8)  0.136 ms  0.122 ms  0.115 ms
 2  192.168.1.1 (192.168.1.1)  25.612 ms  25.617 ms  25.611 ms
The first hop is from node1 to node2, and the second one is from node2 to node_nancy.
With tcpdump we can check the complete isolation of nodes from the production VLAN (and from any other one) :
Here we see ARP requests, DNS messages, multicast reports…
Bridging VLANs with OpenVSwitch
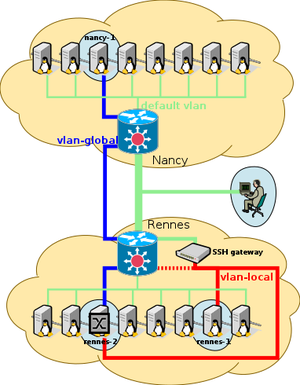
Topology with a software switch
Setup
Our goal is now to allow nancy-1 and rennes-1 to communicate directly at the Ethernet layer, with no IP routing in between. Only 1 IP network must be used, so lets choose the one of the global VLAN, and forget about the one of the local VLAN.
First, we need to unconfigure what we did in the IP routing setup paragraph:
we remove the extra IP route to L_NETWORK on nancy-1, replacing add by del in the ip command.
we deactivate the IP routing functionality on rennes-2 (see the sysctl command: set to ip_forward to 0 instead of 1),
stop the DHCP service in the local VLAN (so that it does not confict with the one of the global VLAN)
unconfigure both network interfaces of rennes-2, and setup OpenVSwitch within a Kaconsole session.
restart the networking service of rennes-1 !
Note


Bridging could be achieved using Linux bridge driver and the brctl companion command, but here we prefer OpenVSwitch which provides enhanced functionalities