Network emulation: Difference between revisions
No edit summary |
|||
| Line 86: | Line 86: | ||
Reserve nodes from a specific cluster: | Reserve nodes from a specific cluster: | ||
{{Term|location=frontend|cmd=<code class="command">oarsub</code> <code>-t deploy -l "{type='kavlan'}/vlan=1 + { | {{Term|location=frontend|cmd=<code class="command">oarsub</code> <code>-t deploy -l "{type='kavlan'}/vlan=1 + {grisou}/nodes=2" -I</code>}} | ||
As an alternative, reserve nodes from any cluster that provides enough Ethernet interfaces: | As an alternative, reserve nodes from any cluster that provides enough Ethernet interfaces: | ||
Revision as of 12:26, 31 March 2022
| Note | |
|---|---|
This page is actively maintained by the Grid'5000 team. If you encounter problems, please report them (see the Support page). Additionally, as it is a wiki page, you are free to make minor corrections yourself if needed. If you would like to suggest a more fundamental change, please contact the Grid'5000 team. | |
Introduction
The Grid'5000 network is built with high-performance network hardware and dedicated network links. This way, the infrastructure can support demanding experiments that make heavy use of network resources.
However, some scientific experiments may actually require a lower-performance network. This is especially the case for experiments that target lower-performance network environments, such as Edge / Fog computing, Peer-to-peer networks, or public blockchains. In other cases, an experimenter may want to vary network parameters (such as latency or packet loss) to study the impact of these parameters on application performance.
Grid'5000 offers a variety of resources in several geographic areas, which may be enough in some cases to build an experiment with the desired level of performance. If more control on network parameters is required, then network emulation can be used instead. Emulation allows to artificially degrade network performance to a desired level, while still using real hardware and a real network (unlike simulation).
The main network parameters that can be emulated are bandwidth, latency, and packet loss. Of course, these parameters can only be made worse than what the real network provides: if the base latency between two nodes is 5 milliseconds, emulation will not be able to provide a lower latency than this.
After reviewing simpler alternatives, this tutorial walks through two main methods to setup network emulation in Grid'5000: one using netem (the Linux NETwork EMulator) directly, and the other one using high-level tools such as distem and enoslib. These high-level tools add a layer of abstraction, but under the hood they also use netem to setup network emulation.
Alternatives to network emulation
Network emulation can be difficult to get right, so if there is a simpler way to obtain the required network parameters, it should be used first.
We describe two possible methods: how to obtain a specific link speed on a node, and how to obtain higher latency using multiple geographical sites.
Using nodes with a specific link speed
Nodes in Grid'5000 have network interfaces with different speed. For Ethernet, this is typically 1 Gbit/s, 10 Gbit/s, or 25 Gbit/s. See Hardware#Networking for a complete and up-to-date list.
Select a node with the desired interface speed, and if necessary follow the multi-NICs tutorial if the interface is not the first one.
In addition, it possible to force an interface to run at a lower speed: typically, force a 1 Gbit/s interface to run at 100 Mbit/s.
For instance, grisou nodes in Nancy have a secondary 1 Gbit/s interface called eno3. To set it up to 100 Mbit/s:
grisou$ sudo-g5k ethtool -s eno3 speed 100 duplex full autoneg off
grisou$ sudo-g5k ip link set eno3 up
You then have to make sure you are using this specific interface for your experiment: it means using KaVLAN if you want to isolate it, and configure appropriate routing.
Using two sites with high latency
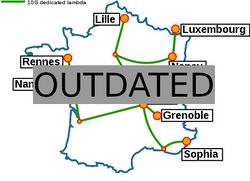
Grid'5000 has infrastructure in several geographical sites: see Grid5000:Network
As such, you can use nodes on two sites that are far apart, and this will result in natural network latency between groups of nodes. For instance, the latency between the sites of Nancy and Rennes is around 25 milliseconds.
There are several options to reserve nodes on different sites:
- simply reserve nodes on each site independently
- use OARGrid
- automate your experiment with scripting
By default, nodes in different sites are not in the same Ethernet network: traffic goes through backbone routers. If you need direct layer-2 connectivity between your nodes, you can use a global VLAN that is propagated to all Grid'5000 sites.
Basic network emulation with netem
Overview
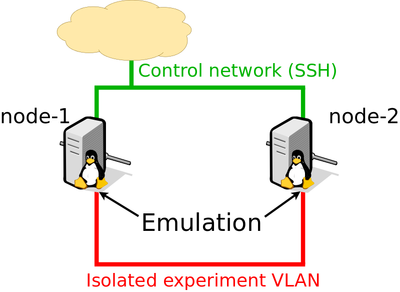
For this basic use-case, the idea is to apply emulation with netem directly on each node. An example setup with two nodes is depicted in the figure.
This setup uses two different networks (i.e. VLANs):
- the default network, in green: it will be used to control the experiment by connecting to the nodes over SSH;
- an additional isolated network, in red: this is where network emulation will be applied.
The advantage of using two networks is to clearly separate the control from the experiment: all control traffic such as SSH, DNS or NFS will not be affected by the emulated network conditions.
This setup can be used with more nodes, and even with nodes from different sites.
| Note | |
|---|---|
Emulation affects outgoing traffic through a network interface. When you apply emulation on | |
Resource reservation
First, if you have specific hardware requirements, identify the clusters you would like to use thanks to the Hardware page. Make sure that nodes have several Ethernet interfaces.
Reserve nodes from a specific cluster:
As an alternative, reserve nodes from any cluster that provides enough Ethernet interfaces:
| Note | |
|---|---|
If you need to connect nodes from different sites, reserve a global VLAN using | |
The last step is to deploy an environment on your nodes:
| Note | |
|---|---|
If you need to access data in your home directory over NFS, deploy | |
Check that you have access to the nodes:
Network configuration
- Parameters
The first step is to determine the name of the secondary interface name on your nodes. Use the Hardware page, the API, or run ip link show on a node.
You need both the actual interface name on the nodes (often enoX or enpXsY) and the API name (ethX).
The following assumes that the interface is named eno2 on the nodes and eth1 in the API.
You will also need the VLAN ID for the secondary network, which will be denoted as KAVLANID in the following:
- Setting up secondary interface
Move the secondary interface of your nodes to the dedicated VLAN:
frontend:
|
kavlan -s -i KAVLANID -m node-1-eth1.nancy.grid5000.fr -m node-2-eth1.nancy.grid5000.fr --verbose |
On each node, run a DHCP client on the secondary interface to obtain an IPv4 address:
| Note | |
|---|---|
If you also need an IPv6 address, see IPv6 | |
Check that connectivity works in the VLAN:
- Setup emulated delay
To add 10 milliseconds of delay in each direction, setup netem on each node:
Remember that netem applies emulated latency for outgoing traffic only, so we need to apply it on both nodes.
Test to ping again between nodes:
The result should be around 20 ms (ping measures a round-trip time, so it accounts for emulated delay in both directions).
- Setup emulated bandwidth
To test emulated bandwidth, start by installing iperf3 on all nodes:
Measure the baseline TCP throughput, with no bandwidth limitation (only the previously configured 2x10 ms delay emulation, which should not affect throughput too much):
You should obtain around 1.2 Gbit/s depending on the CPU of your nodes (on 10 Gbit/s networks, iperf3 is limited by the CPU and will not be able to saturate the network)
Setup an emulated bandwidth limit at 50 Mbit/s on node1:
You should now obtain a bit less than 50 Mbit/s with iperf3.
- Setup emulated packet loss
Setup netem to emulate 1% packet loss from node1 to node2, as well as 10 ms of delay:
Try again to run iperf3 from node1 to node2: you should now obtain around 10 Mbit/s (it's quite variable because of the random nature of the emulated packet loss).
| Note | |
|---|---|
Because we use | |
Network emulation on a Linux router
Overview
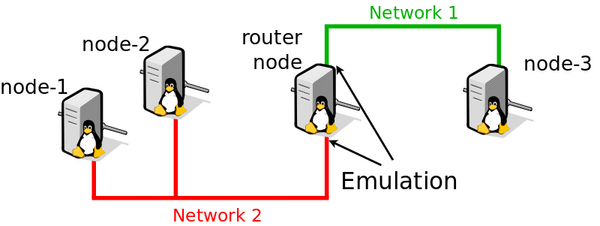
In some cases, it may not be practical to apply emulation on all nodes of your experiment. A more advanced alternative is to introduce a node acting as a Linux router between two groups of nodes: this way, emulation only needs to be done on the router node itself.
Typically, one group of nodes would act as clients, while the other group of nodes would act as servers in a client-server experiment.
Setting up the topology
To setup this topology, follow Network_reconfiguration_tutorial.
If emulation might interfere with the control part of your experiment, you will need to select nodes with an additional network interface for the control network. In that case, the router node will need three network interfaces: one for the control network (SSH), and two for the experiment networks with emulation.
Applying emulation
Emulation needs to be done on the router node. See #Basic network emulation with netem.
Automating network emulation experiments
Several software tools can be used to automate your networking experiments on Grid'5000. Most of them include support for network emulation.
| Note | |
|---|---|
The tools mentioned here are developed independently from Grid'5000. As such, the Grid'5000 team cannot guarantee that they will continue to work on the platform. If you run into problems, the best course of action is to seek community help on the Grid'5000 users mailing list or to report bugs directly to the authors of each tool. | |
Distem
Distem is a tool that can emulate a distributed system on a homogeneous cluster. As such, providing emulated network links is one of the core features of Distem.
To learn how to use Distem for this use-case, follow the Getting started with Distem tutorial.
EnOSlib
EnOSlib is a Python library that helps you setting up an infrastructure to perform experiments. It supports Grid'5000 as one of the possible infrastructure providers.
EnOSlib also supports network emulation out-of-the-box, see the EnOSlib network emulation tutorial.
Distrinet
Distrinet has similar goals as Distem: it allows to distribute a Mininet topology on several physical hosts.
Distrinet also supports network emulation, see the personalized topology tutorial


